

Kevin's Coffee Break
Sunday, November 30, 2014
Tighten the screws!
My family might be the only family that likes to lean on cupboard doors when they open them. This causes the crews for the hinges to work loose. Every few months I go around the house and tighten the screws. For the ones that are really bad? I take a wooden match stick, remove the ignition portion, and then break the wooden match stick off into the screw hole. That will allow the screw to have a tight fit.

Saturday, November 29, 2014
Linda's Christmas Present Part 4
I have decided to use the Utilitech LED Tape Light (also sold under the name of Good Earth Lighting) to light Linda's new cabinet. However, the tape lights come with a two inch connecting wire and I need a two foot connecting wire.
Disclaimer: do not do electrical work of you are not comfortable with it. Always use a professional. This blog neither proves not denies that a professional electrician did this work.


The first thing I did was trim off the paper tag.
The next step was to cut the cable in half.
Then separate the two halves of the wire.
Strip back the rubber coating by quarter of an inch.
The wire in the connector is 22 gauge. While 22 wire is the best, you can use anywhere from 18 to 22 gauge wire to make your extension. I couldn't find any 22 gauge wire so I bought 20 gauge. It would be best to get stranded wire to get a better bond with the adapter's wire. Unfortunately, I could only find solid wire, which is fine, just not ideal.
I cut the length I needs for the extension and stripped the wire.
I then paired the wires so that the adapter wire with the black line tied into the red colored cable, and the adapter wire without the black line tied into the white cable.
Next, secure the connection with solder.
It would be good to complete the connection with some shrink wrap. I didn't have any do I used electrical tape. I wrapped the red wire, then the white wire, then wired them together. The goal is to make sure the metal parts of the red wire do not touch the white wire or else it will cause a short.
Do the same with the other end of the cable. Make sure the red wire connects to the adapt we'd wire with the black wire. When finished, plug the cable into the LED tape light to see if it works.
Friday, November 28, 2014
Barometer Repair
When you own a house you have to become handy doing many different things. We have an antique barometer that came from Linda's Godmother's house. We hang it on a wall and people have a tendency to knock it off the wall when they pass by it.


When that happens? It is time for repair and reassembly.
Thursday, November 27, 2014
Survived Walmart Black Friday
This was the third year I have participated in the Walmart Black Friday... Uhm... Black Thursday event.


I had always heard that Walmart was crazy on Black Thursday so three years ago I attended so I could witness the break down of humanity. Instead, what I saw was how Walmart expertly manages the chaos of a mob. I was impressed with how they conducted the activities. Sure, there are some nuts and several fights, but those tend to be entertaining.
I avoid Walmart in cities on Black Friday - I can't imagine what those are like. Instead, I go to a Walmart way out in the country where people are more polite and more forgiving.
Walmart was packed this year, but not as packed as I had remembered from other years.
A good sense of humor is essential in these situations. Standing in a long line to get a product can be very stressful. The longest line I stood in was to get a 32" TV for under $100. The line snacked down one grocery isle, then back up the next, then down another isle and back, and then down a third isle! But it is worth it for such a cheap TV.
Most of the products sit in shrink wrapped pallets. At a specific time a Walmart employee cuts the shrink wrap and all the customers dive on the pallets to get their stuff.
The best organization comes from the guaranteed products. For one hour they guaranty anyone waiting for specially identified products will get one. Those are the best!
Overall I bought more than I anticipated, saved more than I planned, and had a good time.
Wednesday, November 26, 2014
Linda's Christmas Present Part 3
I have been trying the tape lights and am satisfied. The next step is to position the lights where I think I want them. Because I don't want to permanently attach the lights, I am using blue painter's tape. The painter's tape is weak enough to not cause damage, but strong enough to hold the lights in place.


I lit four of the eight doors and I think it looks good. Especially combined with strings of white Christmas lights laying on top of the cabinet
Tuesday, November 25, 2014
Honeywell HE220A Whole House Humidifier Repair
Being a homeowner requires skill in many different areas. For today's problem, I became a furnace Repairman and a plumber.

I installed a Honeywell HE220A Whole House Humidifier 8 years ago to address regular winter illness my children were having due to a very dry house. I have to replace the humidifier filter at the start of winter. It is a metal filter designed to allow warm water to flow over it while the furnace blows hot air. The hot air causes the water to evaporate and blow throughout the house.

The amount of humidity distributed is controlled by a dial on the controller. The higher I turn the dial, the longer the water pours into the humidifier and the more humidity the house receives.
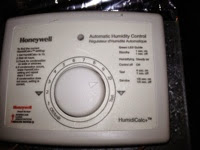 A day after changing the filter, I returned to make sure everything was OK. I discovered that no water was moving through the humidifier! I checked hose coming out of the valve to make sure it wasn't clogged and I found the valve was not allowing water to flow through it.
The valve was not opening, so, I dug out the multimeter. The label on the valve said it was looking for 24vac (volts AC), so, I went looking for 24VAC throughout the electrical flow.

I also checked the transformer that feeds electricity from the main power to the controller. I found 24 voltz everywhere I tested.

The valve was getting 24 volts, but wasn't working. So, the problem must be the valve! But new valves were around $100! And if I paid to have someone install it for me? I would be several hundred dollars into the repair. The answer was DIY! I started by finding the saddle valve. The Saddle valve is where the humidifier's water pipe pierced the main water pipe in order to get a water supply. In my case, the saddle valve pierced the hot water pipe coming out of the hot water tank. That makes sense to me: I would want to spray hot water into my furnace, not cold water, because hot water would evaporate faster and wouldn't try to cool down the air flow. In theory, if you turn the saddle valve clockwise, it is supposed to shut off the water flow to the humidifier. Instead, when I turned clockwise the saddle valve started leaking and spraying water.

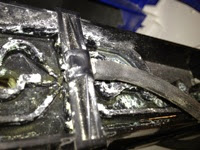


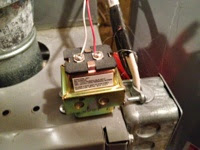


I couldn't shut off the water supply so I came up with another plan. First, I disconnected the water supply from the valve.

Next, I disconnected the drain hose from the bottom of the humidifier and I stuck the water pipe into the drain hose.

With the water disconnected, I was able to remove the valve. I made sure the control knob was in the OFF position before removing the wire nuts and disconnecting the valve electrically, and then I unscrewed the valve from the base of the humidifier.

With the valve removed, the next step was to disassemble it. The way these solenoid valve (Kip U147112) is that a magnet manipulates a plunger. When the magnet is engaged, the plunger raises allowing water to flow. Then the magnet is not engaged, a spring pushes the plunger down to block the water flow. Sometimes those plungers can get stuck either open or closed. Or sometimes the plunger will leak, but that wasn't my problem. No water was passing through the valve.

I disassembled the valve but could not get the plunger off the solenoid. So, I cleaned everything I could access the best that I could and reassembled it.

I put everything back together with low expectations that I made any difference. But to my surprise? Water started flowing into the filter!

Apparently I was successful in getting the valve to open, but it wouldn't close now! So much water was coming through that it was overflowing into a bucket I had left out just in case. If the valve doesn't close, I would be supplying a nonstop flow of hot water all year long.

I immediately suspected I knew why the valve wasn't closing. I thought I didn't get the nut on the top of the valve tight enough, so, I tightened it up. That fixed it! The valve was now able to open and close.
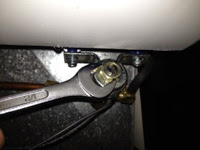
However, my work still wasn't done.When the valve was open, the humidifier was overflowing and pouring water into my catch bucket. I traced the drain hose and found a sediment clog that was restricting the flow of water.

Monday, November 24, 2014
Time for Lights
I use light timers for all out outside lights. After the fall time change I noticed the lights on the kid's fort were staying on past midnight!


I really don't need the neighbors complaining. Apparently the timer that controls the deck lights and fort lights had been changed to run most of the night!
Changing the time is easy. Simply turn the dial until the "current time" arrow is pointing at the current hour. Then push down the blocks around the dial for the hours you would like light, and pull the blocks up for the hours when there shouldn't be light.
I am sure my neighbors appreciate that I have now correctly set the timers.
Subscribe to:
Posts (Atom)