Sunday, December 29, 2013

Home Ownership as an Investment

I have often questioned what I want this blog to be about. The Blog has gravitated toward funny vacation stories and celebrating the work involved with home ownership.

Home ownership is the American Dream. It is as if we are not truly free unless we own a home. It is a great investment. At least, this is what we are raised to believe. And is what I always believed.

Then, in 2007, my friend sold his house in upstate New York, rented in Boca Raton, and said he would never own a house again. This was followed by the real-estate  crash of 2008. This made me question traditional views on home ownership.

Purchasing a house is not an investment. 

When purchasing a house with a 30 year mortgage, $1 of every $2 you pay will go to interest. The cost is worse if you have to include PMI insurance (for those who don't own 20-24% equity). Property taxes are on top of this. In upstate New York, my property taxes almost equal my mortgage payment. Therefore, only $1 of every $4 go toward my equity.  When I was paying PMI and a higher interest rate? It was less than $1. 

Most people argue that the increase in house value plus the tax write-off offset these costs. But do they? If lucky (and if there isn't another crash) your house might increase in value 4-5% per year. The tax write-off involves reducing your taxable income by the amount of interest paid, the tax implications dependent on your tax bracket, which pays back just a fraction of the interest paid. And property taxes seem to increase every year.

To further show how bad of an investment home ownership is? Consider the cost of homeowners insurance. And depending on where you live? You might need flood or hurricane insurance.

As if those costs weren't enough, consider the regular maintenance and unexpected repairs. New roof, hot water tanks, furnace maintenance, driveway, etc. Last year I needed emergency work performed on my kitchen due to a rotting    subfloor. Properly maintaining a house can be expensive.

If you are considering home ownership? Approach it with eyes wide open. Do things to reduce your financial exposure: large down payment, low interest rates, avoid PMI, pick areas with low property tax, and get a home inspection that explains when to expect major maintenance costs. Look for buyer's markets, sellers in hardship, foreclosures, and other opportunities that might let you buy below value. When you do home improvements, only do improvements that you need because it is unlikely you'll get the cost back out when you sell the house. Plan to DiY home improvements and maintenance to reduce those costs (having a buddy that is handy helps a lot). My recommendation? Don't buy a house as an investment because, in my opinion, you can make more money elsewhere. But that is just my opinion. 

Friday, December 27, 2013

Man Cave Minor Update

Minor update: some of the wall decorations received at Christmas are now hung.


Man Cave Update

The Man Cave Project is a low priority long term project. It started in late 2012 when I realized the kids were becoming too old to have a toy room. I constructed the 230sqft toy room when my youngest was two years old. Over the years the toy room became the dumping ground for everything that couldn't fit in the kid's bedrooms. The toy room became a wonderland for any child under the age of 10.

But now? The room rarely gets used. So I took this opportunity to lay my claim for a Man Cave.

Declaring a man cave and having one are two different things. This toy room was stuffed full of toys. To make this work, I needed to clear the toys out. But where would they go?

This question gave birth to the basement storage redesign of 2012.

The storage area is approximately 900 square feet that was a complete mess. To fix it up I purchased enough tubs to give us a total of 150 tubs. I put everything that could fit in a tub into a tub, and then inventoried, color coded, and categorized it.
We call this area "Tub City".

For things that didn't fit on a tub? I built permanent 8x2x7 shelves.

Next came a yard sale in 2013
The yard sale was followed by a huge donation to the St Paul Church Bazaar.
There is still more work to do with the basement storage redesign. But enough work was done that allowed me to start moving toys out of the Toy Room and to get rid of much of it!

Today, there remains some toys but I am starting to be able to see my Man Cave. I already have a TV, projector, furniture, air hockey, and table tennis for the room. For Christmas I received some decorations and, as you can see in this picture, a foosball table. 

The foosball table is now assembled and ready to play! And my Man Cave is one step closer to being a reality.


Thursday, December 26, 2013

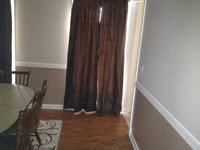
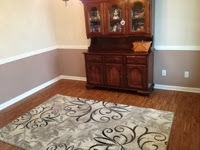
Dining Room Project: Before and After

Before:
After:

Before:
After:


Dining Room Project: Curtains

Since we live in the north we have an appreciation for heavy thermal curtains. Not just single panel, and not just double panel, but quad panel due to an extra thermal layer in the winter that we replace with sheer panels in the summer.

My original plan was to use double rod hangers, but I didn't like the hanger I purchased. Instead, I decided to use the hangers that came with the rods.
First I did the outer rod's hanger by drilling through the window casing and then using the provided screws.
Next came the inner rod.
Then the rods.
And finally the curtains.

All that's left is a few more pieces of furniture to move in, hang some pictures, and update a picture frame.

Monday, December 23, 2013

Dining Room Project: New rug

The new rug has now been added to the room.


Dining Room Project: Trim is painted

The trim is all painted with a coat of semigloss. This was a second coat. The first coat was applied before the moulding was hung.

I am in the home stretch to finishing this project! Remaining steps: a new rug, new curtains, update a large picture frame, and move the rest of the furniture back in.

Sunday, December 22, 2013

Dining Room Project: Injury Report

It seems that every one of these projects brings some kind if injury, and the Dining Room project is certainly following the pattern.

Due to the proximity of Christmas my wife offered to help paint the trim so the project could hurry along. She was standing on a folding stool. She moved the stool and didn't realize it was still partially folded when she stood back on it. Her weight caused the stool to open which pinched her finger in the gear. 

She claims hearing a crack and found herself in an interesting position: she could not pull her finger out of the gear because she was standing on the stool. She needed to get off the stool and fold it in order to release her hand.
This resulted in a quick trip to Urgent Care for an xRay. Even though she was in a lot of pain, swelling, and the finger had changed color, the doctor reported she didn't break it.

My wife's attempt to save some time actually cost some time and added to the project's cost. But we are very happy that her finger is going to be fine and she is doing OK.

Chair Rail

Now that the entryway case moulding is in place I can do the chair rail.

The bottom of the chair rail will be exactly 32" above the floor. I used a laser level to find this.

I then used a stud finder to locate where all the wall studs existed behind the drywall. As I found a stud I marked the wall with a pencil.

I placed the chair moulding against the wall and transferred te stud marks to the chair rail so I knew where I would be nailing.

When the chair rail boards meet in the corners of the room, the boards need to be cut at 45 degree angles.

Using the laser level, I nailed the chair rail to the wall.
Next comes the caulk. I caulk all the seams, nail holes, and put a bead down the edge.
Using my rubber tipped caulk tool, I smooth out the caulk.
Now the moulding is finished.

Next time I will do a coat of paint on all the trim.


Doorway Moulding

My next step was to add the doorway moulding. When I did the baseboard moulding I placed Plinth Boards and the bottom corners of the entryways. The Entryway moulding gets set on top the Plinth boards.

Doing the entryway case moulding is as simple as cutting 45 degree angles on the saw.
The trick is to get the boards to come together perfectly with no gaps. It is easier to cut the moulding long and trim compared to cutting it too short. In my case? I don't know what my measuring tape was measuring, but I cut the threshold case moulding way too short requiring another trip to the hardware store for another board.

You may find it impossible to get a perfect seam between two 45 degree cuts. A small gap can be filled in with caulk.

Once I had everything cut and confirmed it got together, I nailed it into place.
The nail holes get filled with a little bit of caulk, wiped clean with my finger to make a smooth covering for the nail.

Now the entry way's case moulding is completed for both entryways.


Saturday, December 21, 2013

Baseboard Moulding

It is time to work on the moulding. to get ready I need to tare off the existing baseboard and shoe moulding. I will be replacing several pieces that are dented, cutting some other pieces, and changing some of the configuration.

First is to use my super bar to pry off the baseboard.


And then cut off the nails with a pair of front cutters.


Then cut the baseboard and shoe molding.


I reattached the baseboard and show molding to the wall with new nails. The nails get driven into the moulding with a nail setter.


The final step is to apply white painter's caulk to the baseboard and show molding. Before I do this, I have to make sure any existing caulk from the old moulding is cleaned off.

Then I add a brad of caulk.

You can smooth the caulk with your finger, but, I found this tool with a rubber tip that works like a dream.

And now the baseboard moulding is done!


Thursday, December 19, 2013

Dining Room Project: Moulding Types

There are several things you should know about moulding: the kinds of moulding and what material the molding is made out of.

First? The kinds of moulding.
(Rona.ca)
For my project I will be using a chair rail, baseboard, shoe, plinth, and casing.

Next? The materials: hardwood, pine, and MDF.

MDF is Medium Density Fiberboard. It is the cheapest and least durable. It looks like compressed cardboard. If you are on a budget you will be very tempted to grab MDF. But I caution you against it.

Next is Pine. Pine costs a little more than MDF, looks very similar to MDF, and is more durable. Even though it is more durable it will easily get banged up. And ten years of wear and tare, I am replacing  the pine baseboards.

Finally is hardwood. This is the most durable and expensive. It is common for hardwood to cost three to four times more than pine. While both MDF and pine come pre- primed and ready to paint, hardwood usually comes bare. Bare hardwood gives you the option of preserving the wood look by applying a finish, or painting on primer so it can be painted whatever color you would like. Also hardwood often comes with special designs or patterns carved into the wood.

For this project I am using pine for the casing, baseboard, shoe, and plinth. I am using hardwood for the chair rail.


Monday, December 16, 2013

Dining Room Project: Paint Tips

I mentioned earlier that you should avoid changing the color of any rooms. It is much easier to simply paint over the top of the same color. But keeping track of all those colors can be difficult.

Here is a trick my brother taught me. If you have a little paint left? Keep it for touch-ups. Otherwise throw the paint can away (in an environmentally sensitive way) and just keep the lid.

Keeping all these paint cans sitting around can take up a lot of room. So, nail a chain to the rafters of your basement (or garage/shed in warmer climates) and use hooks to hang the paint cans. Just make sure you do not store paint cans near a furnace or hot water tank to avoid a fire.

Dining Room Project: Eggshell and Semigloss

The second coat of brown has been applied to the bottom of the wall. You can see in this picture how we selected different sheens for the paint. The top is an eggshell while the bottom is semigloss. Generally, the higher the gloss the more durable, but it shows more of the imperfections.


Saturday, December 14, 2013

Dining Room Project: Painting Molding

The dining room has two entry ways. Both entry ways will receive door frame moulding. It is very typical to incase the entire entryway frame (both sides of the wall and the area in between). I am not encasing the entire frame for two reasons: first, this is only decorative. And second, there are obstructions on the other side of the wall that would make adding molding difficult. One such obstruction is a kitchen cabinet that goes almost flush with the doorway frame. 

I purchased moulding that was already primed. All I need to do is add the first coat of paint, and then they will be ready to cut. Optionally, I could have cut them before painting. The second coat of paint will be added after moulding is mounted to the wall. 

Dining Room Project: Painting the bottom

It is time to paint the area that will be below the chair rail. The first step is to use a laser level to mark where the chair rail will be.
I then used painter's tape to mark off the separation. 

Next, I applied the first coat of the paint.

There is still a lot of work to do. One more coat of paint, prepare the door frame molding, hang all the molding, and put the room back together. Then the second part: new curtains, oriental rug, and re-do a large picture frame. Stay tuned for more updates!


Thursday, December 12, 2013

Dining Room Project: Painting the Chair Rails

The chair rails have been primed. The next step is to apply the off-white paint to the rails. I am only doing one coat of paint now. I will do a second coat after the rails are mounted to the wall.


Dining Room Project: New paint color

After a trip to the hardware store and examining pain samples under every available light in the electric lamp section, we arrived home with a new paint color for the wall. The lighter color has been applied and Linda is much happier now. Tomorrow, I will begin painting the part of the wall that will be below the chair rail.


Tuesday, December 10, 2013

Dining Room Project: The Tools

When visiting the hardware store you will find many different kinds of rollers, brushes, and painting supplies. Do you really need all this stuff? Probably.

I don't know what a professional painter would say, but I have done enough painting to arrive at some conclusions. First, you will want to tape and cover anything you don't want paint to go on. Painting is easy, preparation is where the work is. That means removing outlet covers, using a lot of painter's tape, and a bunch of .7 mil plastic sheets.

I cover the floor with a 12x4 canvas paint cover. I love these and have two. I move them around as needed to protect the floor. I like these because they are durable and reusable.

Get paint rollers with the correct ply (not too bushy). When you use them, roll in overlapping "V's". I never clean paint rollers because they are cheap and disposable. 

My paint tray uses a liner. I hate cleaning the paint trays and for $1, I don't have to. I just throw the liner away.


I have painted rooms with and without a square edger and an edger can take a 30 minute job and turn it into a 5 minute job. There are corner edgers that are very useful too. 

I use brushes too. Like rollers, I always throw the brushes away, so, I usually get the cheapest brushes I can find. But with cheap brushes, the bristles come out and you'll spend half your time picking bristles out of your paint job. Depending on what I am doing and how important it is, I may spend a couple of dollars for a brush I will throw away.

Next tip? Paint tends to pool around the edge of the paint can. Use a hammer and nail to make several holes to the paint will drain back into the can.


Make sure you get all the tools before starting the job and you'll have a great experience.


Dining Room Project: Picking a Color

My brother has a simple rule: once you set the color for a room, never change it. For the rest of your life, keep it that exact color. The more I paint, the more appreciation I have developed for this rule.

It is difficult to pick a new color for a room. Colors are simply a reflection of light. As a result, the color changes according to the light source. If you take a paint sample outside, it will look different on a sunny day versus a cloudy day versus at dusk. Bring it inside and it will look different under the store's fluorescent lights versus all the different kinds of light bulbs and all the different kinds of lighting levels.

The only way to be sure (or better written: more sure) is to buy small portions of the paint for $3 and paint a $1 poster board. Then put the poster board into the room and observe it throughout the day. What does it look like with the sun coming through the window? With mid day sunlight? During the day with the lights on? And at night? You'll notice the paint takes on different characteristics under the different light conditions.

And just when you think you have the color you want? You have to consider the room's original color might show through the new color, especially if you are going from darker to lighter. You can combat this with multiple coats but it may be difficult to completely remove its influence.

Now you know how to pick a paint color. Good luck!

Monday, December 9, 2013

Dining Room Project: Primer

We selected raw ivy based molding for the chair rail. It is white hardwood that would be perfect to stain. Instead, it will get out standard trim color: off white.


The first step is to get some primer on the chair rails. I set up a paint area in my wood shop and applied the primer. By tomorrow, they should be ready to paint!


Dining Room Project: First Coat of Paint

The dining room will be painted two tones. Linda had a Girl's Night Out which included a stop at the hardware store to pick out the paint colors. They decided to have a light brown below the chair rail, beige above the rail, and a shade of white for the trim.

The first coat of beige is done!

There is a rule: measure twice, cut once. They should have a similar rule for picking paint color. In sunlight, the paint looks beige. But the yellow Incandescent lightbulbs of the chandelier makes the dried paint look pink. Linda hates it. So tomorrow we will return to the hardware store to pick a new color.


Dining Room Project

It has been a while since last I blogged. This isn't due to a lack of things that must be done, it is due to a lack of time. Since the last entry there have been all of the typical seasonal activities: Halloween decorations, fall decorations, and then Christmas decorations.


But now we are on to a new project: the Dining Room Project. Our house is custom built. We worked with an architect to maximize function. Many homes have a dining room that rarely get used. We wanted a functional dining room that would be used with almost every meal. Ten years later? The room needs to be updated.

And so the Dining Room Project is born. For this project I will be adding doorway molding, chair molding, two tone color scheme, new curtains, reframing a poster sized wall hanging, and adding an oriental rug. My goal is to have the project come in under $500. 

This is what the room looks like now (taped and ready to be painted).

Tune back to the blog and watch the progress!